Hi there, I’m Lisa, a teacher of middle schoolers and student of living an active and simple and healthy lifestyle. I try to learn something new every day; hopefully you'll find something here to entertain or inspire you.
For me, after several years of searching out existing boxes, I felt inspired to create a letterbox series of my own for others to find. I mentioned in my Letterboxing 101 post that people create letterboxes because they have something to share with the world; the catalyst for me was when my husband and I lost our three cats within a relatively short span of time. As anyone who’s ever had pets can imagine, that was pretty rough! My first series, hidden at my favorite park, honors our three little buddies. I loved the opportunity to share their stories and keep their memories alive.
My second series is bird-related. We put several bird feeders outside of our kitchen window, and they attract an amazing variety of birds. At certain times of year, we’re so thronged with hungry birds that it’s hard to keep the feeders stocked. I became a little obsessed with learning to recognize all of the visitors at our feast. Of course from there it progressed to identifying bird songs, and decoding bird behavior, … and creating a series of bird letterboxes.
What are your passions? Is there a special person or event you wish to commemorate? I can’t think of a better way than with a letterbox to tell the tale. If you’re ready to make the transition from finder to planter, these are the basic steps in creating a letterbox:
Carve your stamp(s)—You can create a single stamp or a multi-stamp series. There is something about sets of three that I like; my series each contain three stamps. (My Letterboxing 201 post details how to design and carve your personal stamp.)
Decide on a location—Usually, if you’re hiding your stamp in a public location, you just go and do it when you’re ready. Privately-owned settings can work too, if you talk to the owner and explain your goal. People are generally kind of tickled to be in on a secret like this. I learned after the fact that some parks require permits for hiding letterboxes (and geocaches, too), so you might want to check just to cover your bases. It would hardly do for your letterbox to be confiscated after you’d worked so hard to prepare and plant it!
Prepare your letterbox—People use a variety of weatherproof containers to house the goods—I’ve seen plastic boxes, pill bottles, duct-tape-covered baggies. It’s a good idea to double-bag your stamp and logbook by putting them in a baggie and then putting that baggie into your container. Even though they’re supposed to reclose and rehide the letterbox carefully after finding it, people get a little sloppy sometimes.
Hide it!—Go find the perfect spot and stash your letterbox. There are a couple of things I always think about when hiding a box—and that I appreciate when I’m the one finding a box. Is there a little spot nearby where people can inconspicuously get out their supplies and conduct the exchange of stamps? Maybe a nice rock, or a bench? Another factor to consider is potential overgrowth. A hiding spot that is easily accessible in the winter could be overgrown with poison ivy or some other pesky vegetation in the summer. When hiding my box, I take detailed notes so that when I write my clues, I can be as specific as possible with landmarks, number of steps to take, which direction to face, and so forth.
Large boulder, not too far off the trail … Perfect!
Write and test your clues—I like to invite a friend or family member to use the clues I wrote to try to find my letterbox. Do the directions make sense? Does it work the way I thought it would? A few tweaks might be needed to smooth out the process. Once you’ve polished up your clues, post them!
Post your clues—If you don’t already have an account on Atlasquest, you’ll need one now. The online form for creating a letterbox is very straightforward and easy to complete.
Check your mailbox—Don’t forget to log in to Atlasquest periodically to check your mailbox. People will leave helpful comments about the health of your stamp to alert you to necessary maintenance. Sometimes they give compliments about how much they enjoyed your stamp. (Those are the best.) You’ll want to visit your actual letterbox regularly too, to make sure everything is holding up okay and to see who’s found it and stamped your logbook. After you’ve been letterboxing a while, you’ll start to recognize the trail names of fellow enthusiasts.
Letterboxing is a most enjoyable rabbit hole to fall into. From making your initial find, to carving a personal stamp, to creating a series for others to find, each step pulls you in and propels you along. Once you make the transition from seeker to hider, your subconscious will be ever on the alert for interesting new places that would make the “perfect” location for a letterbox. Embrace it! Enjoy it. See you on the trail!
I was maybe eight years old when I first read Scott O’Dell’s Island of the Blue Dolphins. It’s a captivating story about a teenage girl who survives alone on an island for nearly two decades. She has no choice but to become entirely self-sufficient, building her own shelter, hunting her own food, fashioning her own clothing, her only companion a wild dog she manages to tame. Part of the allure for me was that it was a survival story about a girl. Most books like this tend to feature boys (Gary Paulsen’s novels, like Hatchet and The River, come to mind), so O’Dell’s story was invigorating and inspiring. Possibilities swirled through my suburban brain. Could I coax a squirrel to eat out of my hand? Could I collect enough bird feathers in our yard to make a dress like Karana’s?
The most amazing part is that O’Dell’s book is based on a true story. Though there are many more questions than answers about the mysterious Native American woman, we do know that she lived alone on the island of San Nicolas—a windswept and remote member of California’s eight Channel Islands.
Few facts about her can be verified for certain, but it is believed that she belonged to the Nicoleño people living on the island. However, when the last remaining members of her tribe—most of whom had already been killed in conflicts with seal hunters—were rounded up and shuttled to the mainland in 1835 by the Franciscan friars eager for cheap labor and Christian converts, she was left behind. Several accounts say that she was searching for her son, who was missing from the boat. Subsequent ships sent to the island to search for her were unsuccessful. The story of the “Lone Woman of San Nicolas” became something of a legend on the mainland. But 18 years later, in 1853, Captain George Nidever, a local sailor and hunter, decided to try his hand at finding her. On his third attempt, he located and followed a trail of footprints on the island that led him to the lost woman. She welcomed the captain and his men as guests, and they spent a couple of weeks on the island with the woman, hunting and learning about her way of life as best they could through the language of signs and gestures.
Photo of the woman believed to be Juana Maria (Source)
When they returned to the mainland she came with them (willingly) and was taken to the mission at Santa Barbara. At this point you might be thinking, “Aw, a happy ending!” Well … not so fast.
First, nobody there could communicate with her. She spoke a language unrecognizable to them or to the native peoples residing at other nearby missions. The missionaries christened her “Juana Maria,” and she reputedly was cheerful and good-natured, seeming to be happy in her new home. Secondly, as was the fate for so many natives, she died of disease just weeks after her arrival at the mission.
Figures. After surviving on her own for 18 years on a deserted island! A small plaque honoring Juana Maria adorns the wall of a courtyard at the mission today.
So last summer, an interesting trip came about: My husband and I, along with my parents, met up with my sister and her family in San Diego. We then road-tripped up to Santa Barbara to see the mission, and … to visit Channel Islands National Park, and thus check off one more location on my bucket-list quest to explore all of the U.S. National Parks.
Of the eight islands in the group, only five are part of the park system and open to visitors—the island of San Nicolas is not one of them. So although I couldn’t see the island where “Juana Maria” actually lived, I got about as close as possible and used my imagination to complete the picture.
Channel Islands National Park is one of the lesser-visited in the park system, and it is not hard to see why. It takes a bit of effort to get there. It’s not the kind of place where you easily pop in for a day hike, or book a relaxing weekend at the lodge (there isn’t one). There’s no comfy “driving tour” with convenient pull-offs for your photo ops. If I say “Pacific island” and you picture Tahiti, well, might need to recalibrate your expectations. However, for those intrepid explorers willing and able to go for it, a visit to the islands is an adventure you won’t soon forget. Its remoteness and ruggedness are part of what makes the place so spectacular. So channel your inner Juana Maria and prepare for some memorable experiences!
1. The Ferry Ride
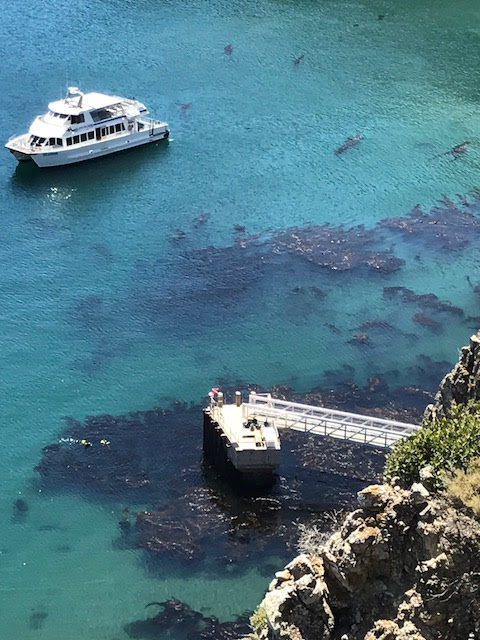
The island we visited, Santa Cruz, is the largest and nearest to the mainland, but even so it requires an hour-long ferry ride to get there. I’ve been on ferries a couple of times, but never a ride as long or, frankly, as rough as this one! It wasn’t exactly a sight-seeing pleasure cruise … though we did see some delightful sights, like sea lions clustered on a buoy enjoying the sun, and dolphins bouncing along outside of our wake. And after an hour at sea, with no land in sight, it gave me chills when our island finally emerged out of the haze, remote and mysterious. I couldn’t stop thinking about Juana Maria, her solitary existence on an island like this one…. Did she walk along the cliffs, gazing out toward the horizon, waiting for a ship to appear?
My eagerness to arrive at the island was twofold. Because as we zipped across the water, bumping over the waves, my fellow passengers began to lose the battle with seasickness. One after another they staggered to the rails, their retching masked for the most part (thankfully) by the wind and waves. It made me start to feel queasy, but I couldn’t tell if I was actually starting to feel a little seasick or if it was just the power of suggestion. Nobody in my party succumbed, perhaps because by chance, we’d chosen seats in the part of the boat that was the calmest. A stroke of luck! Or was it?… (Guess where all the seasick passengers were instructed to convalesce?) Let’s just say I was good and ready to disembark by the time we reached the island. As a little extra insurance, we made sure to stop by the island canteen to pick up some dramamine tablets to pop before the return trip.
(Hmm. Maybe I shouldn’t have led with that story…. Don’t let it deter you from visiting the islands! Really, it’s worth the trip. I promise. Just take some dramamine. And maybe ride in the open cabin on the top of the boat. That’s what we did on the return trip, and the fresh air was fantastic.)
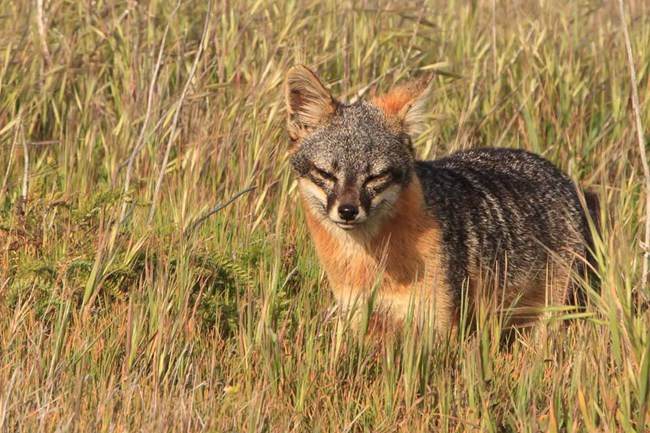
One inhabitant of Santa Cruz is the island fox, and these critters are bold! Reading about them in our guidebook before our visit, we crooned, “Oh, I hope we get to see one of them!” In fact, it would have been hard not to see one. Unlike its nocturnal mainland brethren the gray fox, the island fox has no natural predators and therefore is active at all times of day … especially during visitors’ lunchtime picnics. They were practically tame, sidling up to our tables, trying to elbow their way in for a bite of sandwich.
“Mmm, what’s for lunch?”
Sort of like the Galápagos tortoise or Madagascar’s ring-tailed lemur, the island fox lives only on the Channel Islands. In addition, the subspecies on each island is actually unique—so the island foxes we met on Santa Cruz are not exactly like the foxes on any of the other islands. They are adorable creatures and have the most expressive and inquisitive little faces. Just be prepared—they are persistent to a fault … and in addition to being about the size of the typical housecat, they are similarly disinclined to following orders from humans.
3. Surf or Turf
Visitors to Santa Cruz can explore the natural wonders by land or sea. Hiking trails of varying difficulty circle and bisect the island, and there is a kayak and snorkel outfitter from the Scorpion Anchorage area. As we were day visitors to the island (some people stay and camp), we had a limited amount of time to explore and decided to focus on hiking. We hiked the Cavern Point Loop Trail and a portion of Smuggler’s Road, peaceful forays that cut through fields of wildflowers and hugged the clifftops, offering expansive vistas of the bright blue sea.
Being a Mediterranean-type climate, there aren’t many shady trails, but the constant ocean breeze combined with the sun to make our hikes quite comfortable.
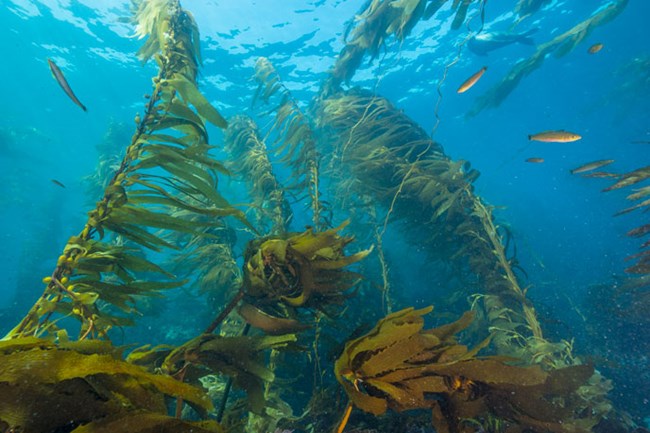
Given more time on Santa Cruz, visitors should definitely explore it by sea as well. Guided kayaking trips navigate the sea caves around the shoreline, affording a unique perspective on the island’s flora and fauna. There is even more to see below the surface, if you can brave the chilly Pacific waters. Snorkelers and scuba divers can explore the magical kelp forests in the crystal clear water, which we looked down into from the cliffs high above.
At its warmest, in September, the water is only around 60 degrees! We did at least wade out into the ocean, carefully picking our way across the rocky, pebbled beach. It was frigid. Being fully submerged in the water to dive would certainly be … invigorating!
And since we hadn’t packed our Gillyweed…. Aquatic exploration will have to wait for the next visit.
Harry Potter in the Triwizard Tournament, anyone?? (Source)
All in all, our California adventures were an unforgettable combination of fact and fiction, sea and sand. I’m not sure I could survive alone for 18 years on a deserted island, but next time, maybe I’ll at least give the overnight camping a try.
For Further Exploration
The National Park Service has a section about the Lone Woman of San Nicolas, featuring connections to O’Dell’s novel, information about the history and culture of the native peoples, and updates about archaeological discoveries on the islands.
By now you know what letterboxing is and hopefully have enjoyed a few letterboxing adventures of your own. (Wait, you don’t know what it is?!? Get busy reading my Letterboxing 101 post first and then come right back!)
It’s pretty common when people begin letterboxing to just purchase a ready-made stamp from a craft store. And that’s okay, because at least it means you’re letterboxing! But it’s fun to create your own stamp, and these “personal logos” are much more unique and interesting than the store-bought fare.
Here’s what you’ll need to create your first stamp:
Paper (to sketch your design and test your stamp) Pencil Carving block Carving gouges Ink pad
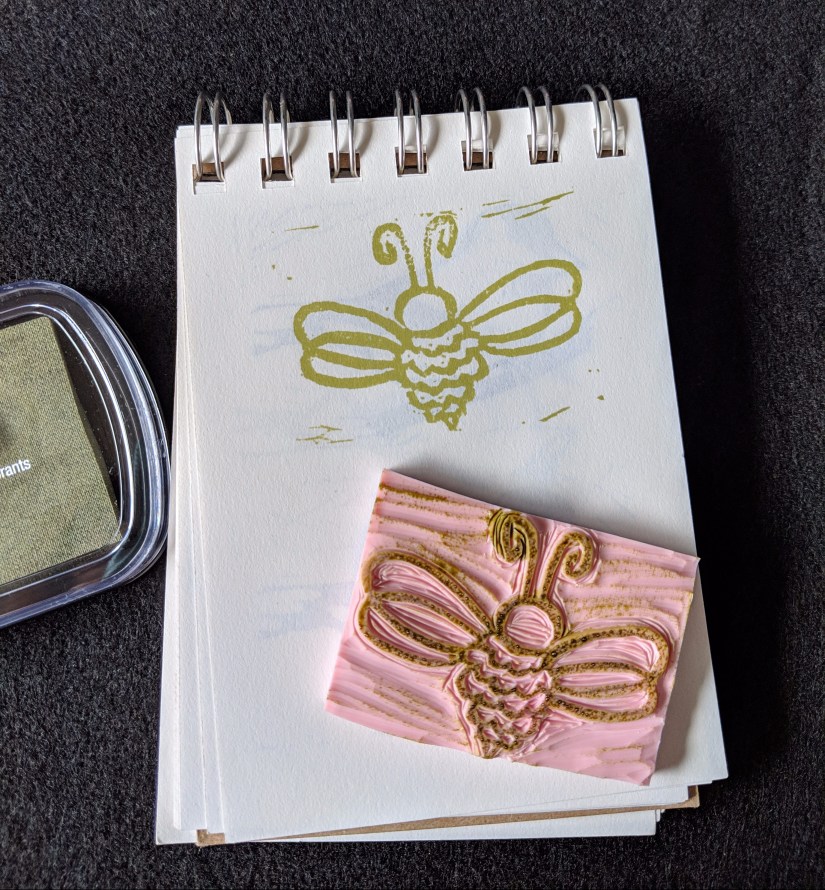
Step 1—Drawing: Begin by drawing your design on a piece of paper. A good size for your design is about 2” x 2”. Most of the logbooks you’ll be stamping are pretty small. Your design should hint at something unique or special about you, and it should have simple lines—not too much detail, at least for your first stamp. Trace over the lines of your drawing with a pencil to darken and thicken them, then press your paper, design-side-down, onto the carving block (which you should pre-slice into the size you want your stamp to be). My favorite carving block is the rubbery pink Speedy Carve. (I buy it from the local craft store and use a coupon.) With your drawing facedown, rub the paper firmly with your finger to transfer a shadow of your design onto the carving block. Before you lift the paper away from the block, peek underneath. Do you see a mirror image of your drawing? If so, you’re ready to carve. If not, carefully lower the paper and rub some more to finish transferring your pencil lines to the carving surface.
Step 2—Carving: For my first few stamps, I carved my design using an X-acto knife. While this did work, it was hard to get my carvings super clean and finessed. I upgraded to a set of carving tools from the craft store, little gouges intended for linoleum and other substrates—like letterbox stamps. Carve away all the negative space from your design, using the wider gouges to remove a lot of rubber quickly, then shifting to the narrow gouges for careful work around the lines of your design. Remember, you can always remove more rubber, but once it’s carved away you can’t put it back.
Step 3—Refining: When you think you’ve got your stamp in pretty good shape, give it a test run. Ink it up on your ink pad and press it onto a scrap sheet of paper. There will almost certainly be some spots that need further refinement. Rinse off and dry the stamp and attend to any areas that need more material removed. After a few more rounds of testing, you should be ready to hit the trail!
Now you have your very own one-of-a-kind stamp to make your mark in the letterboxing world. I’m sure you have an awesome trail name to go along with it. You are more than ready to get out there and enjoy some letterboxing adventures. Stay tuned for my third post in this series, which will help you take your letterboxing game to the next level by creating a series of your own for others to find!