That delightful little pillow of foam on your palm lathers quickly and rinses easily. It uses water and soap more efficiently, so it’s good for the planet and your wallet.
But the best thing about it? It’s ridiculously easy to make your own.
As a general rule I try to minimize my exposure to harmful chemicals in my personal use products. Also as a general rule, products that fit my criteria seem to cost more—which is something I enjoy working around by making them myself. And you can make a high-quality, earth-friendly foaming hand soap for a fraction of what you’d pay for one at the store. Heck, your soap will cost less than the cheapest soap you can find at the store.
A bit of math:
A 10-oz. bottle of foaming hand soap with (relatively) simple ingredients costs $3 to $5. Even if I refill that bottle when it’s empty, I’ll still spend $6 or $7 on a refill pouch, which works out to a little more than $2 per 10-oz. bottle.
The thing is, when you look at the list of ingredients, the first one is . . . water. Topped off with some cleansing agents.
Well, shoot. Can YOU fill a bottle with water? Can YOU top it off with a cleansing agent? Then you can make your own foaming hand soap. (Although you’ll actually add these ingredients in the reverse order. We’ll get to that in a minute.)
The only somewhat magical ingredient in this whole equation is the bottle itself. The bottle has two chambers—the lower one holds the soap mixture, and the upper one is filled with air. When you press the pump, it forces air into the soap mixture, and voila, you’ve got Foamy Soap.
You can purchase a pretty glass dispenser of course, or just buy a cheap bottle of foaming soap at the store, dump that crap out, and fill it with your own mixture.
Now, I’ve seen some tutorials that advocate simply taking regular liquid hand soap and watering that down in your foaming soap dispenser (using a ratio of about 1 part soap to 4 parts water). That will produce a foamy soap, but I’ve also read that by interfering with the proportions of ingredients in the original soap, you might reduce the soap’s effectiveness.
You can avoid that concern by using liquid castile soap, which is highly concentrated and therefore intended to be diluted. I am a fan of Dr. Bronner’s. The soap is biodegradable, free from synthetic preservatives, and has a million and one household uses. It’s available unscented, but I also enjoy the lavender, rose, and peppermint varieties. (Some people craft a scent themselves by using essential oils.) A 32-oz. bottle of Dr. Bronner’s costs about $13, but because it’s highly concentrated, it lasts a long time. I easily get 30+ refills of foaming hand soap out of one 32-oz. bottle of liquid castile soap.
Crunch those numbers and you see that you can create your own high-quality foaming hand soap for less than $0.50 per bottle.
So how do you do it?
Homemade Foaming Hand Soap
Fill a clean foaming soap dispenser about 3/4 full with warm water.
Add about 2 tablespoons/1 oz. (just eyeball it) of castile soap. (If you add the soap first, it will start to suds up when you try to add water, so always add it second.)
Screw the cap on the dispenser and gently agitate it to blend the mixture.
I don’t remember where exactly I first happened upon the idea of herb spirals…. But I do remember that I was immediately smitten.
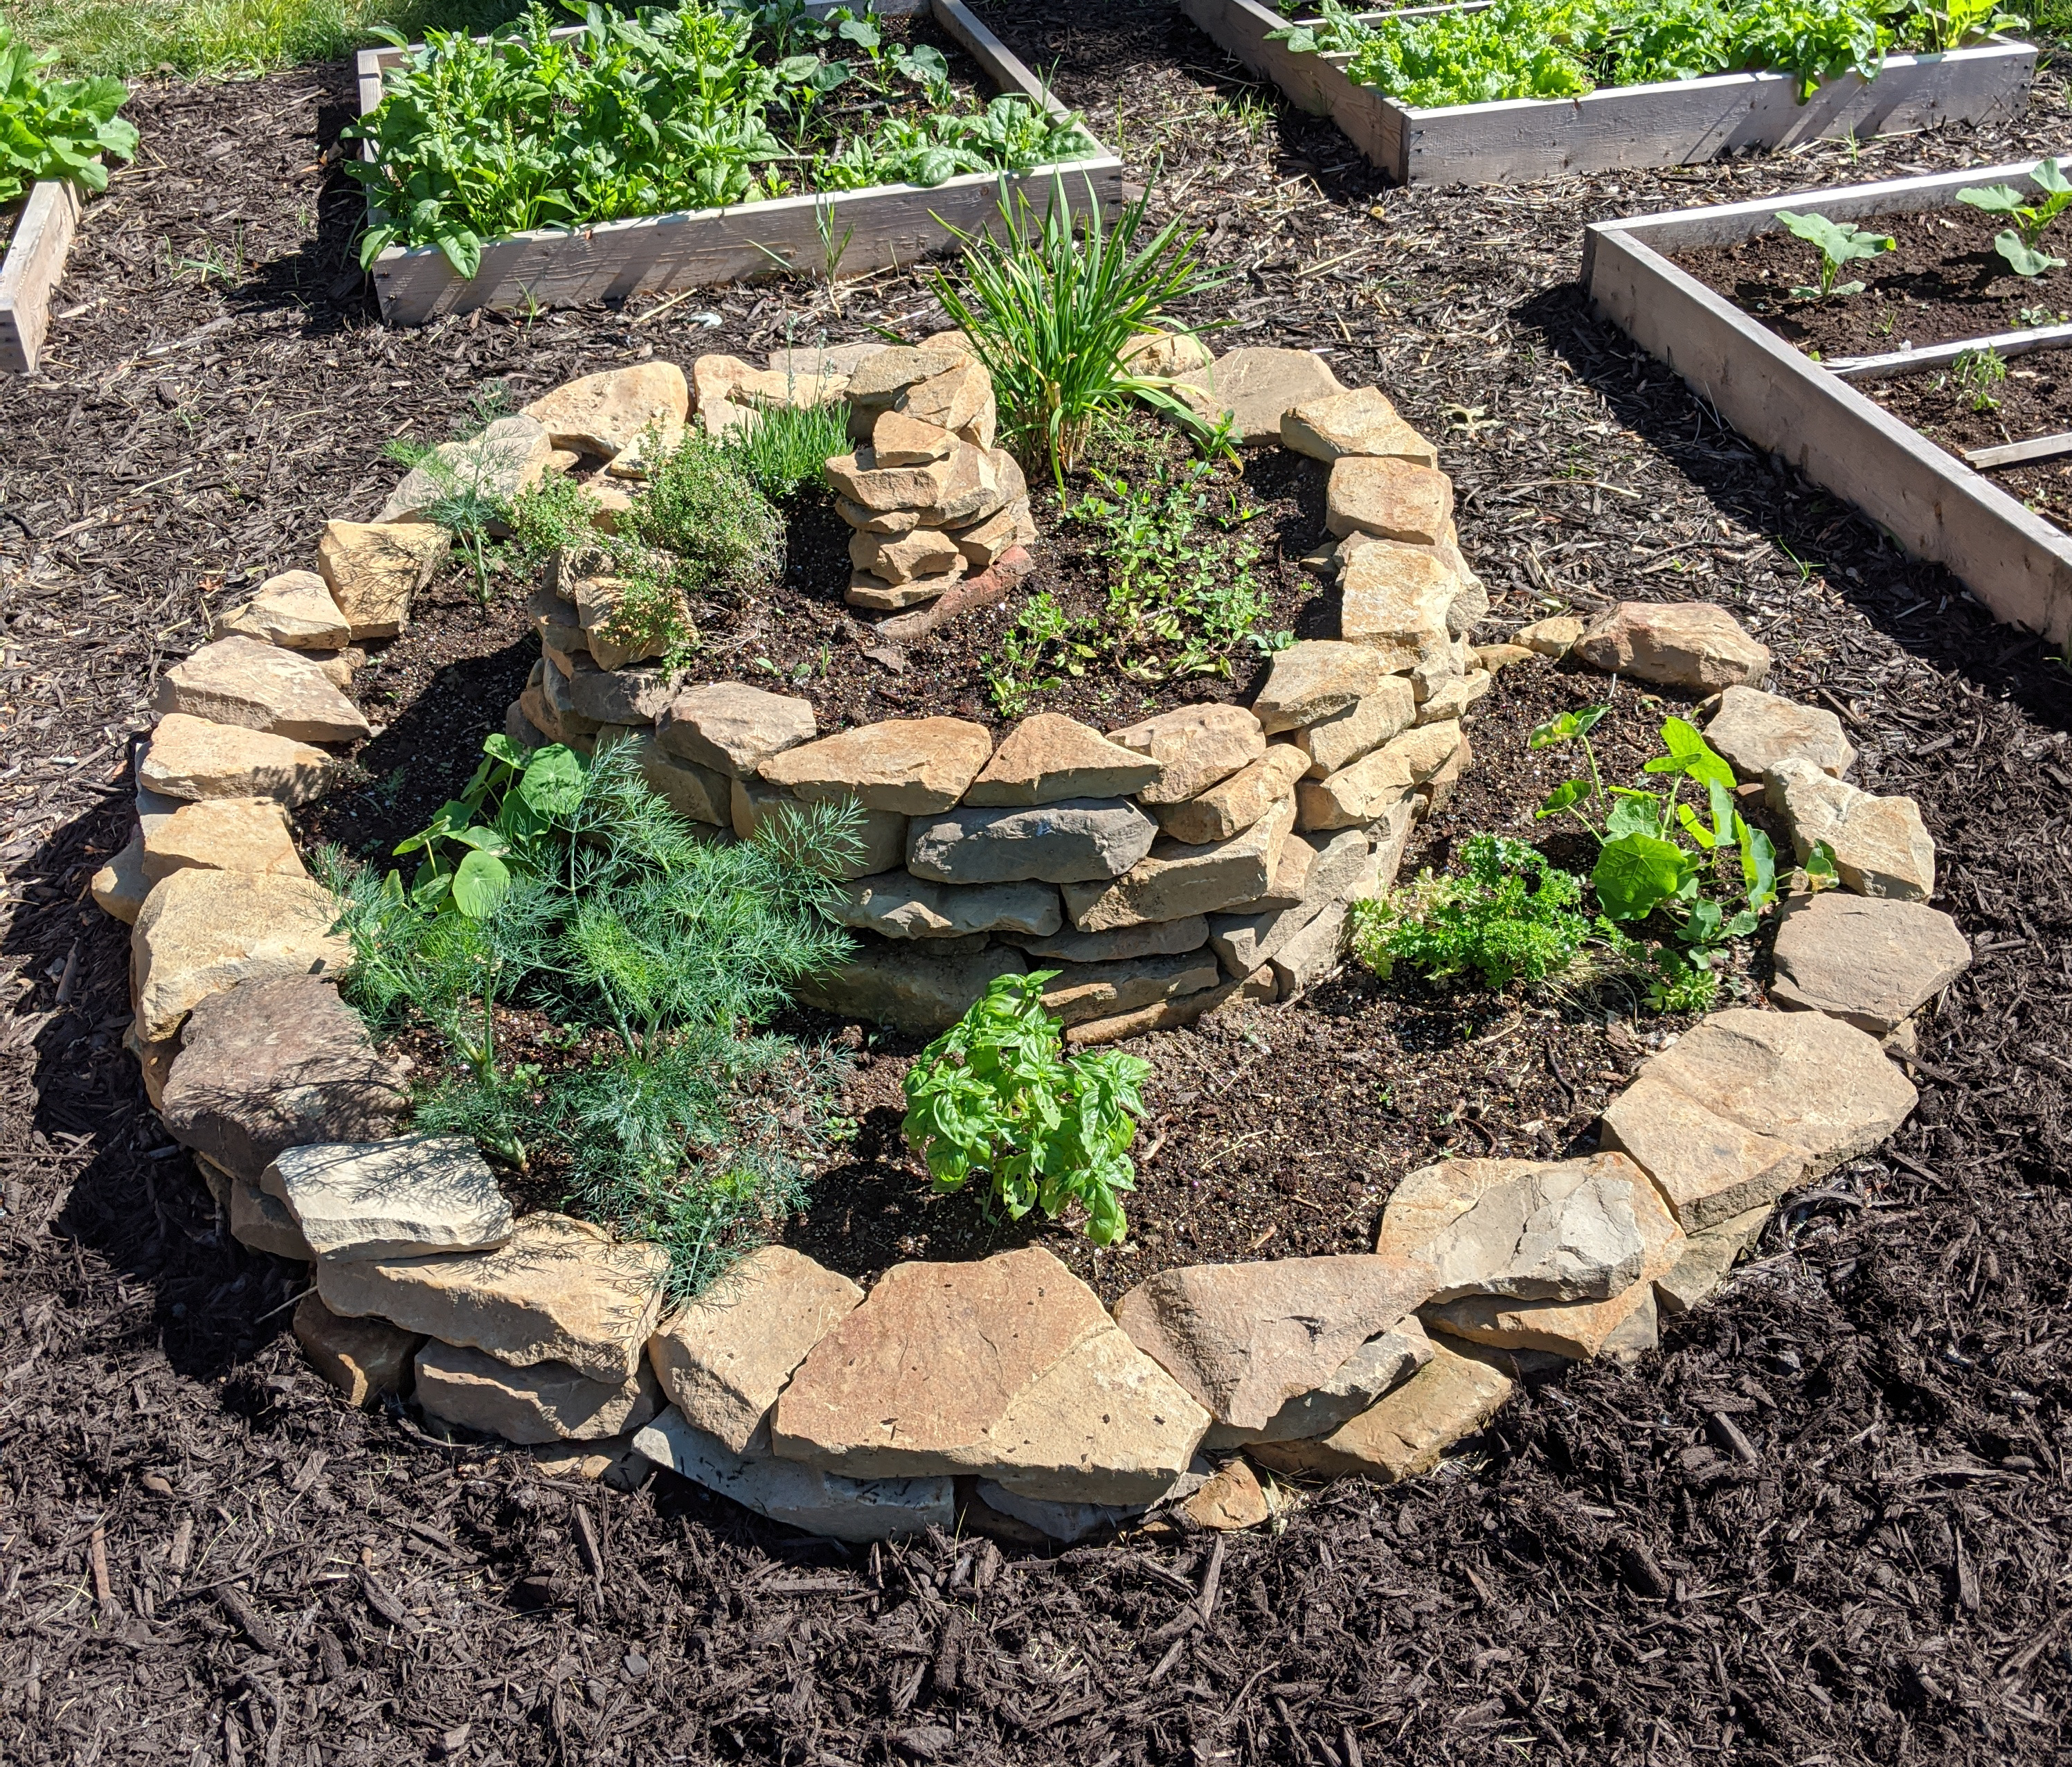
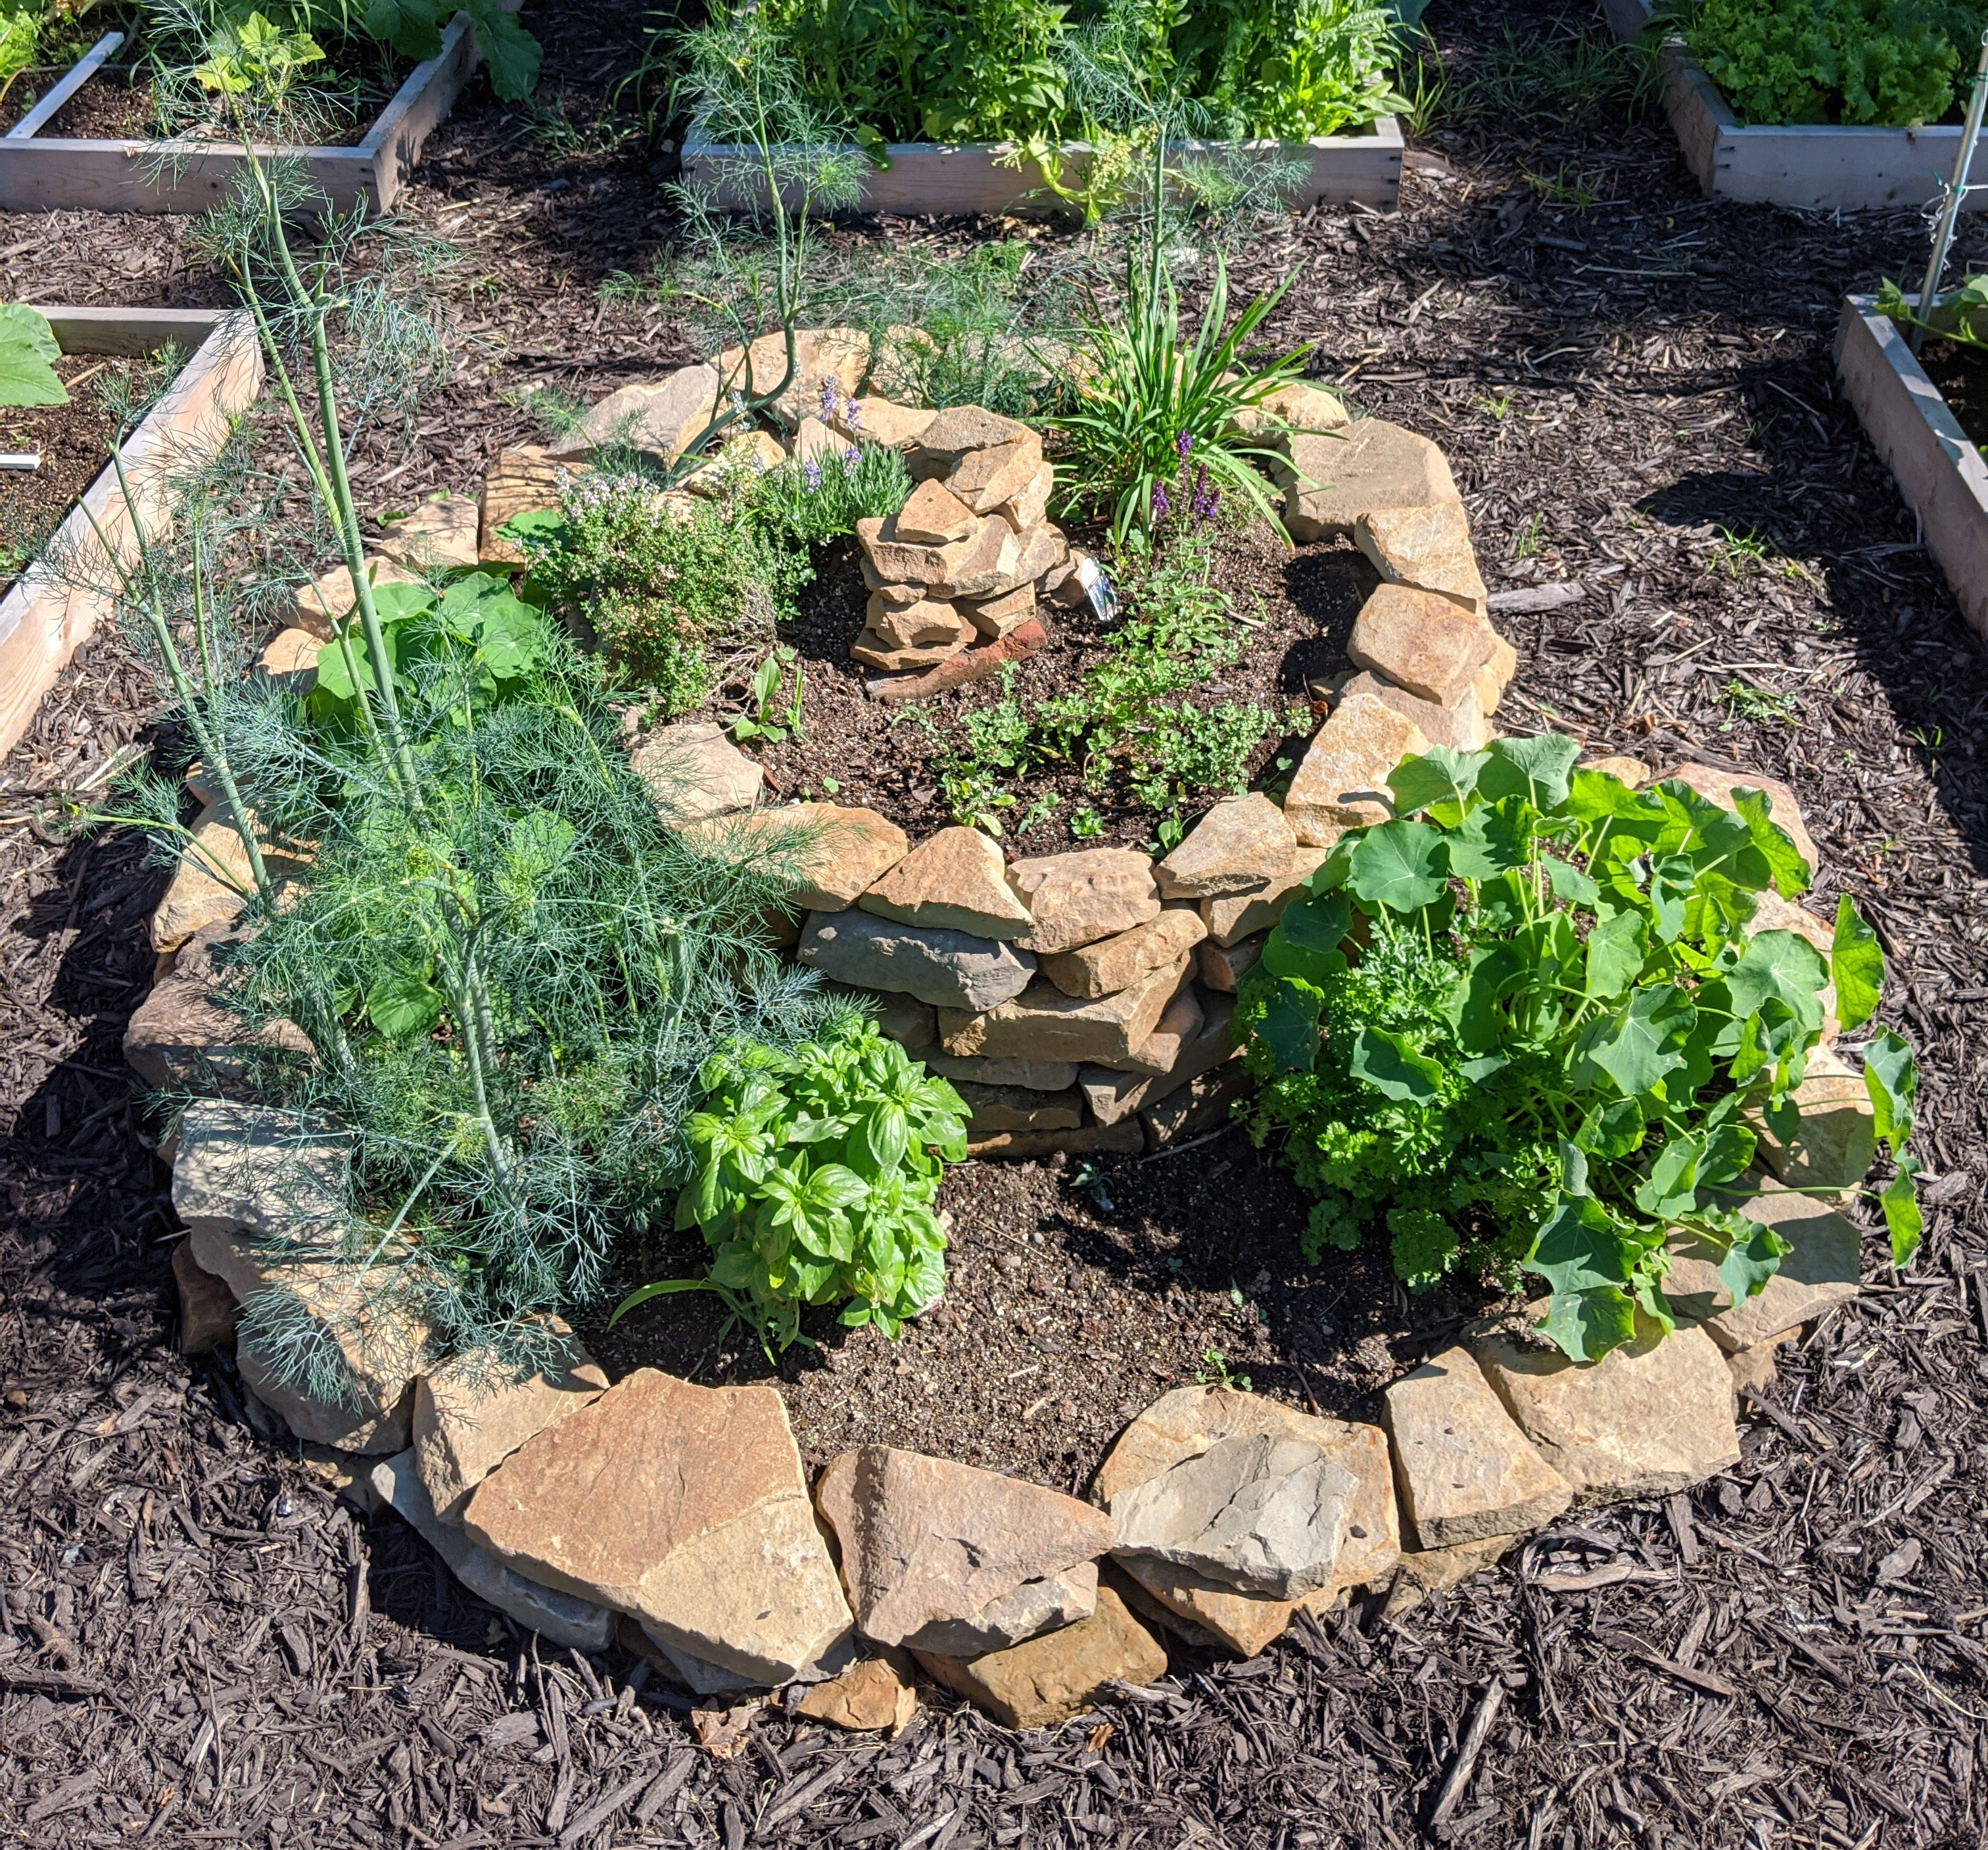
An herb spiral is a small spiral-shaped garden bed, usually built with stone or blocks, that is tallest in the center and tapers down to ground level on the outside edge.
My herb spiral, early June
The idea seems to have emerged within the permaculture movement of the 1970s and its emphasis on “permanent” or sustainable agriculture that works in harmony with nature.
With their tandem beauty and functionality, herb spirals fit right in with the permaculture philosophy. Different herbs require different amounts of sunlight and moisture, and the winding levels of an herb spiral create microclimates that suit each plant. Herbs that thrive with full sun and drier soil go toward the top of the spiral, or on the southern-facing slopes. Plants that will do better with a little more shade or moisture belong on the northern side, or lower on the spiral.
I loved the idea of nourishing each herb with exactly what it needs.
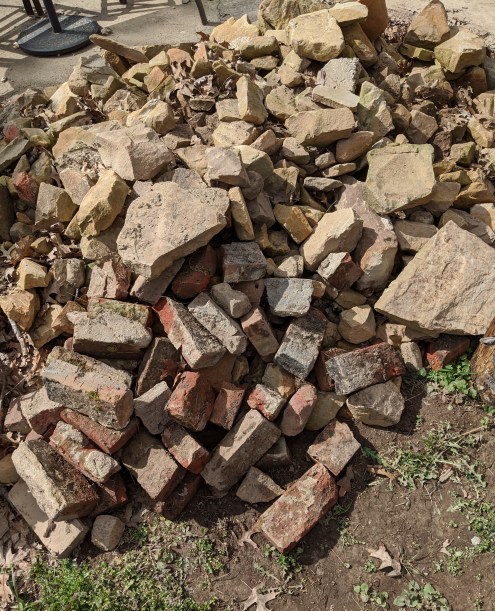
In addition, as luck would have it, I had a ton of stone to use for building the structure.
My husband and I have completed a couple of projects to improve drainage around the exterior of our house. This involved digging trenches for French drains around the foundation as well as digging trenches for pipes leading down to the road. (So much digging.) Every plunge of the shovel into the ground turned up another large stone, which we started collecting in a pile out back. (So many stones.) We didn’t have a specific use for all those stones, but it just seemed like, I don’t know, surely we’d find a project for them someday?
The stones continued to accumulate over the next couple of years as I dug in the ground to landscape and garden. I’m sure our neighbors loved the ever-growing mountain of stones on our patio. The stone coordinated quite nicely with the pile of wood chunks we plan to use someday when we install a wood-burning stove, as well as the leftover pieces of trim and siding from our never-ending home renovations.
At any rate, I had plenty of stone that was itching to be repurposed.
If you research herb spirals, you’ll see that people create the walls out of all sorts of materials. Bricks, flagstones, pavers, even glass bottles.
Source: gardeners.com
Source: onegreenplanet.org
Source: permacultureproject.com
Although you can make the spiral any size that works well in your space, I found that a diameter of two-meters (or about six feet) was a pretty common measurement so that’s what I decided to do. If the spiral is too small, it won’t sufficiently create “microclimates” along its elevations. If it’s too large, you’ll have a hard time reaching the center of it for maintenance and harvesting of herbs. For a spiral of this width, many suggested a center height of one meter, but I thought that seemed disproportionately tall for my garden area. At its center, my spiral is more like 24″.
Step 1: Locating
The first rule of herb gardens is to make sure they’re convenient to your kitchen. You’re much more likely to snip and use fresh herbs if it’s not a hassle to do so. My garden area is just outside the kitchen door, so that was a non-issue. However, I took my time choosing a spot within the garden for the herb spiral, knowing that it would not be easy to relocate it if I changed my mind. I also studied several diagrams online to take into account the most advantageous north-south orientation. I identified a spot that would make the herb spiral a focal point at the center of my other raised garden beds, and then laid out the basic perimeter. I had already covered the area with weed-cloth, so it was ready for business.
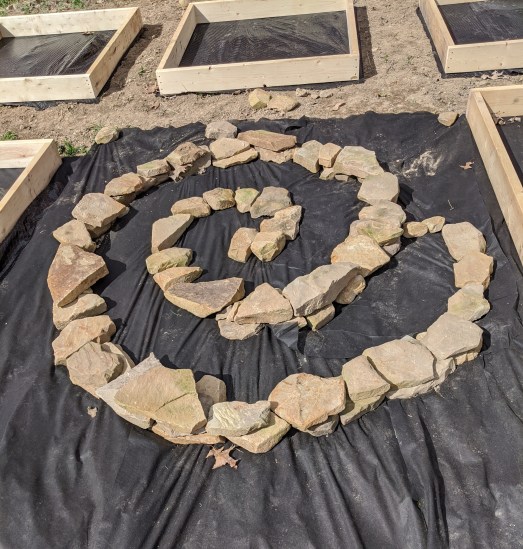
Step 2: Outlining
I cut a three-foot length of string and swung it around a post wedged in the center of my spiral, using small stones as placeholders to mark out the perimeter. Kind of like drawing a circle using a compass. From there I continued using small stones to demarcate the interior whorls of the spiral. I eyeballed the curves to make sure they were evenly spaced—about one-foot apart—and matched my intended design.
Step 3: Stone-Shopping
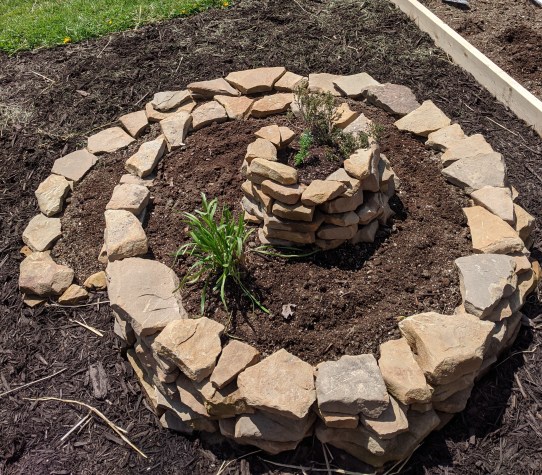
Next, it was time to shop the stone pile. As I sorted stones into several piles, large, medium, and small, I focused on finding stones with flat surfaces figuring they’d balance and stay in place better in the dry-fit wall.
Ye olde stone pile
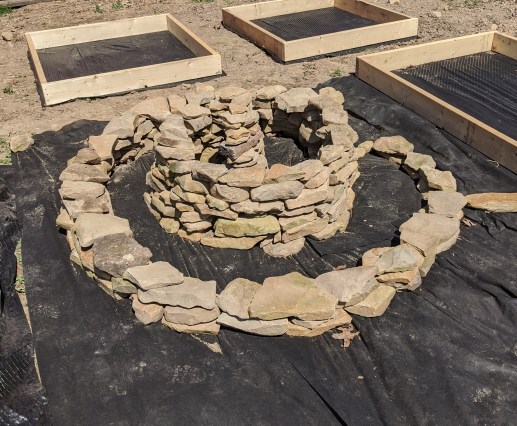
Step 4: Constructing
Now the part I was most excited about: Building the wall! For the foundation layer I chose large, flat stones, experimenting with different placements until I had formed a snug fit between each neighboring pair. I felt like I was working a puzzle with very heavy, dusty pieces. I laid out the foundation row for the entire spiral, following the curves I had outlined in Step 2. With the foundation in place, I continued adding rows of stone to the wall and graduated the height of the spiral until it reached a finished height in the center of about 24″. Not surprisingly, it got trickier to fit stones as the spiral grew. The foundation layer was easy, but each successive layer not only had to fit together horizontally, but also sit securely on the stones underneath it. Some people use mortar to lock their stones in place, but I wanted to keep my spiral as simple as possible. Mortar also felt like a really big commitment. I think I’m going to love the herb spiral, but what if it’s a flop? Much easier to dismantle it sans mortar. A trick I read to make your walls sturdy is to have them lean ever so slightly inward, to offset the outward-pushing force that the soil and herbs will create.
Step 5: Filling
With the spiral shell complete, it was time to fill it. A common gardening trick when filling deep containers is to use stones or rubble to eat up some of the negative space and reduce the amount of valuable soil needed. Many people do the same with herb spirals, particularly in the very center where the space is deepest. But where would I find a bunch of stones to fill it in?…
So yes, back to the stone pile for some little ones to toss in the herb spiral.
I used the same soil mixture for the herb spiral as I did in my other raised garden beds, a blend of peat moss, coarse vermiculite, and home-made compost. From last year’s herb garden, I transplanted some chives, thyme, and a lavender shoot, orienting them in places on the spiral where they will be snug and happy. For the rest of my herbs, I planted seedlings and seeds. The list below provides placement guidelines for many common herbs; the ones in CAPS are herbs I have actually planted so far:
Top: oregano, rosemary, LAVENDER, SAGE, lemongrass (plants that like it dry and sunny)
Mid-level, south-facing: BASIL, THYME, DILL, CILANTRO, MARJORAM (plants that need good light and drainage)
Low- to mid-level: CHIVES, PARSLEY, chamomile (plants that enjoy moist soil and partial sun)
Low-level, north-facing: MINT, lemon balm, catnip (plants that like it moist and shady)
It is also not a bad idea to interplant pest deterrents like marigolds and NASTURTIUMS.
All in all, I’m happy so far with the herb spiral! Time will tell if my construction skills were up to the task, and whether the microclimates encourage the herbs to thrive. It’s the end of June, and so far, so good. Stay tuned for updates later in the summer!
For me, after several years of searching out existing boxes, I felt inspired to create a letterbox series of my own for others to find. I mentioned in my Letterboxing 101 post that people create letterboxes because they have something to share with the world; the catalyst for me was when my husband and I lost our three cats within a relatively short span of time. As anyone who’s ever had pets can imagine, that was pretty rough! My first series, hidden at my favorite park, honors our three little buddies. I loved the opportunity to share their stories and keep their memories alive.
My second series is bird-related. We put several bird feeders outside of our kitchen window, and they attract an amazing variety of birds. At certain times of year, we’re so thronged with hungry birds that it’s hard to keep the feeders stocked. I became a little obsessed with learning to recognize all of the visitors at our feast. Of course from there it progressed to identifying bird songs, and decoding bird behavior, … and creating a series of bird letterboxes.
What are your passions? Is there a special person or event you wish to commemorate? I can’t think of a better way than with a letterbox to tell the tale. If you’re ready to make the transition from finder to planter, these are the basic steps in creating a letterbox:
Carve your stamp(s)—You can create a single stamp or a multi-stamp series. There is something about sets of three that I like; my series each contain three stamps. (My Letterboxing 201 post details how to design and carve your personal stamp.)
Decide on a location—Usually, if you’re hiding your stamp in a public location, you just go and do it when you’re ready. Privately-owned settings can work too, if you talk to the owner and explain your goal. People are generally kind of tickled to be in on a secret like this. I learned after the fact that some parks require permits for hiding letterboxes (and geocaches, too), so you might want to check just to cover your bases. It would hardly do for your letterbox to be confiscated after you’d worked so hard to prepare and plant it!
Prepare your letterbox—People use a variety of weatherproof containers to house the goods—I’ve seen plastic boxes, pill bottles, duct-tape-covered baggies. It’s a good idea to double-bag your stamp and logbook by putting them in a baggie and then putting that baggie into your container. Even though they’re supposed to reclose and rehide the letterbox carefully after finding it, people get a little sloppy sometimes.
Hide it!—Go find the perfect spot and stash your letterbox. There are a couple of things I always think about when hiding a box—and that I appreciate when I’m the one finding a box. Is there a little spot nearby where people can inconspicuously get out their supplies and conduct the exchange of stamps? Maybe a nice rock, or a bench? Another factor to consider is potential overgrowth. A hiding spot that is easily accessible in the winter could be overgrown with poison ivy or some other pesky vegetation in the summer. When hiding my box, I take detailed notes so that when I write my clues, I can be as specific as possible with landmarks, number of steps to take, which direction to face, and so forth.
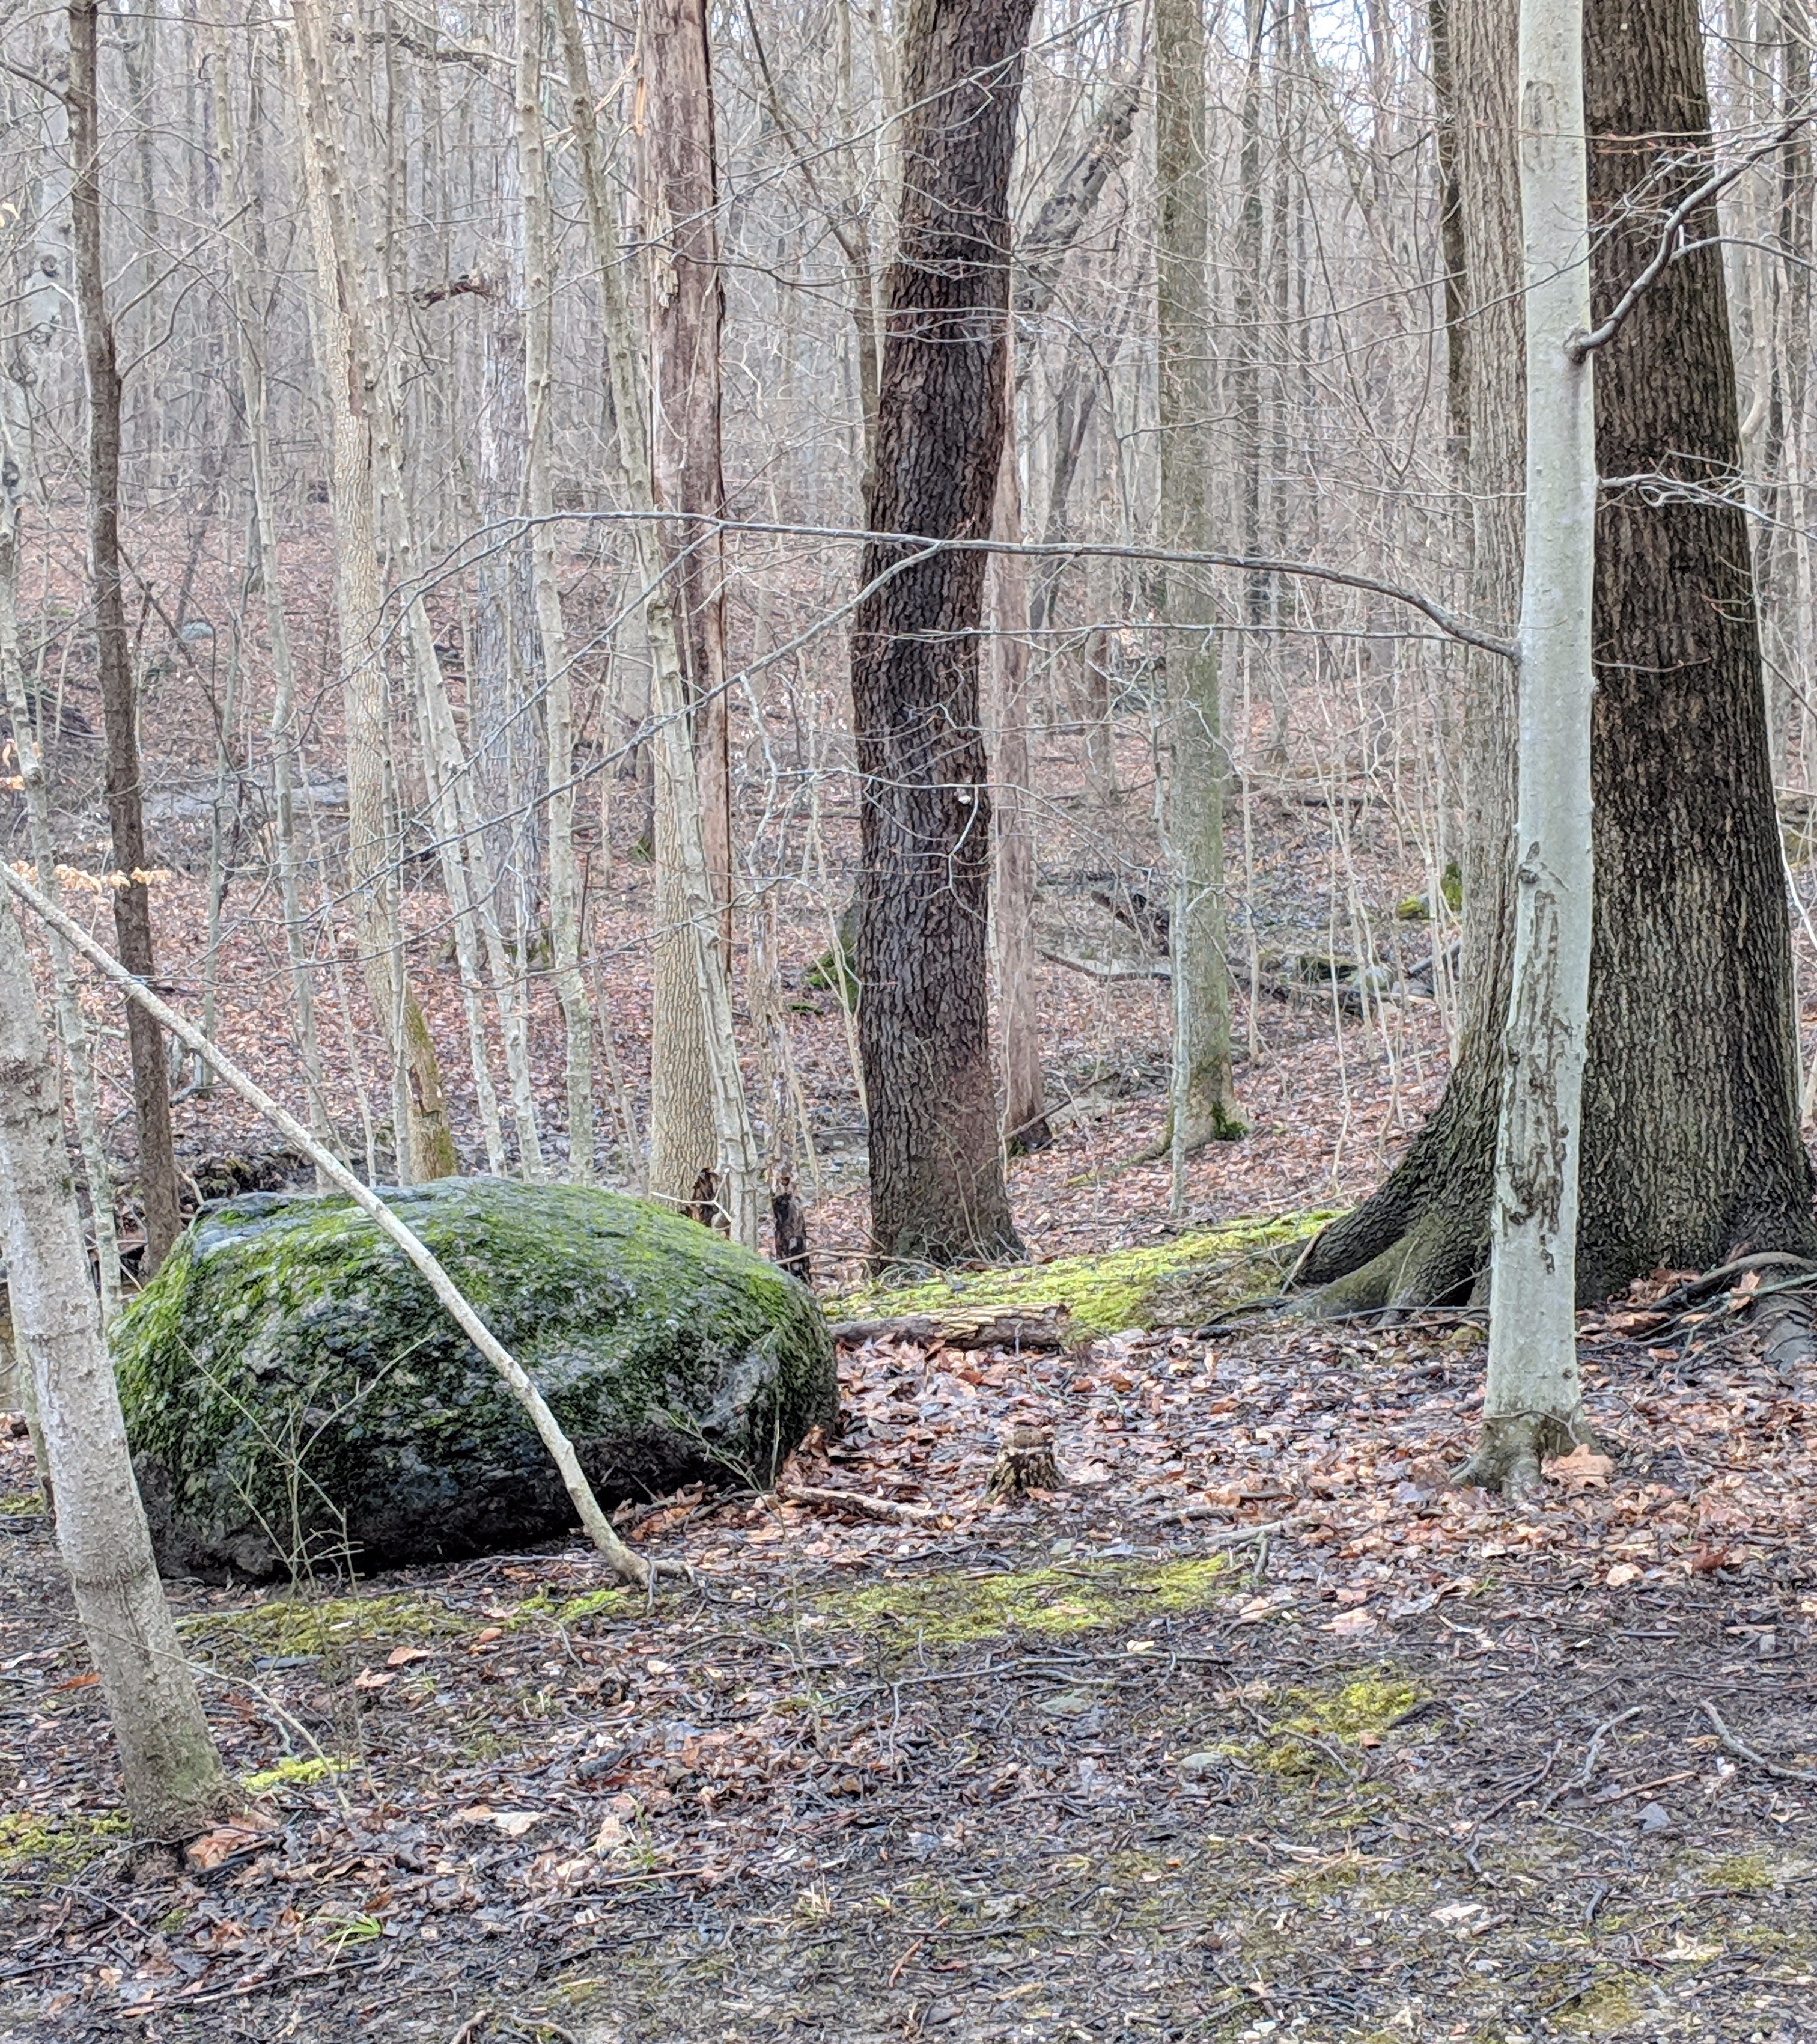
Large boulder, not too far off the trail … Perfect!
Write and test your clues—I like to invite a friend or family member to use the clues I wrote to try to find my letterbox. Do the directions make sense? Does it work the way I thought it would? A few tweaks might be needed to smooth out the process. Once you’ve polished up your clues, post them!
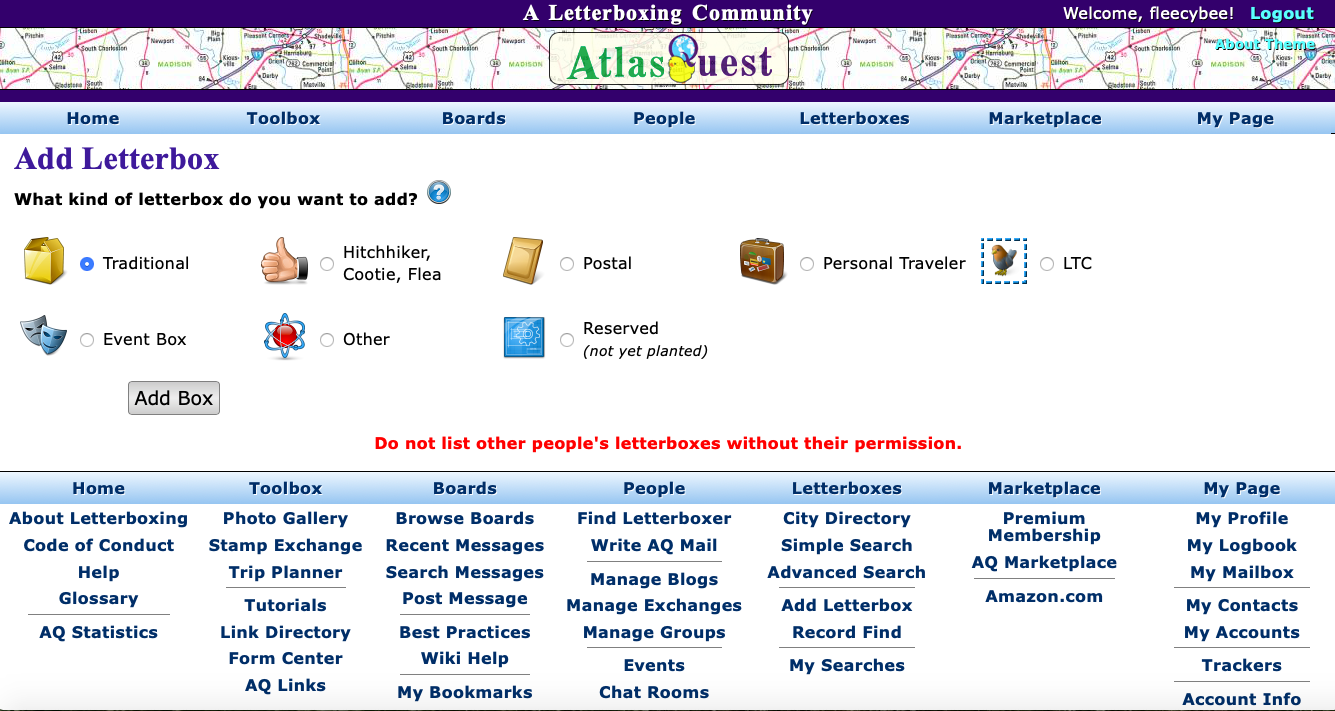
Post your clues—If you don’t already have an account on Atlasquest, you’ll need one now. The online form for creating a letterbox is very straightforward and easy to complete.
Check your mailbox—Don’t forget to log in to Atlasquest periodically to check your mailbox. People will leave helpful comments about the health of your stamp to alert you to necessary maintenance. Sometimes they give compliments about how much they enjoyed your stamp. (Those are the best.) You’ll want to visit your actual letterbox regularly too, to make sure everything is holding up okay and to see who’s found it and stamped your logbook. After you’ve been letterboxing a while, you’ll start to recognize the trail names of fellow enthusiasts.
Letterboxing is a most enjoyable rabbit hole to fall into. From making your initial find, to carving a personal stamp, to creating a series for others to find, each step pulls you in and propels you along. Once you make the transition from seeker to hider, your subconscious will be ever on the alert for interesting new places that would make the “perfect” location for a letterbox. Embrace it! Enjoy it. See you on the trail!