By now you know what letterboxing is and hopefully have enjoyed a few letterboxing adventures of your own. (Wait, you don’t know what it is?!? Get busy reading my Letterboxing 101 post first and then come right back!)
It’s pretty common when people begin letterboxing to just purchase a ready-made stamp from a craft store. And that’s okay, because at least it means you’re letterboxing! But it’s fun to create your own stamp, and these “personal logos” are much more unique and interesting than the store-bought fare.
Here’s what you’ll need to create your first stamp:
Paper (to sketch your design and test your stamp) Pencil Carving block Carving gouges Ink pad
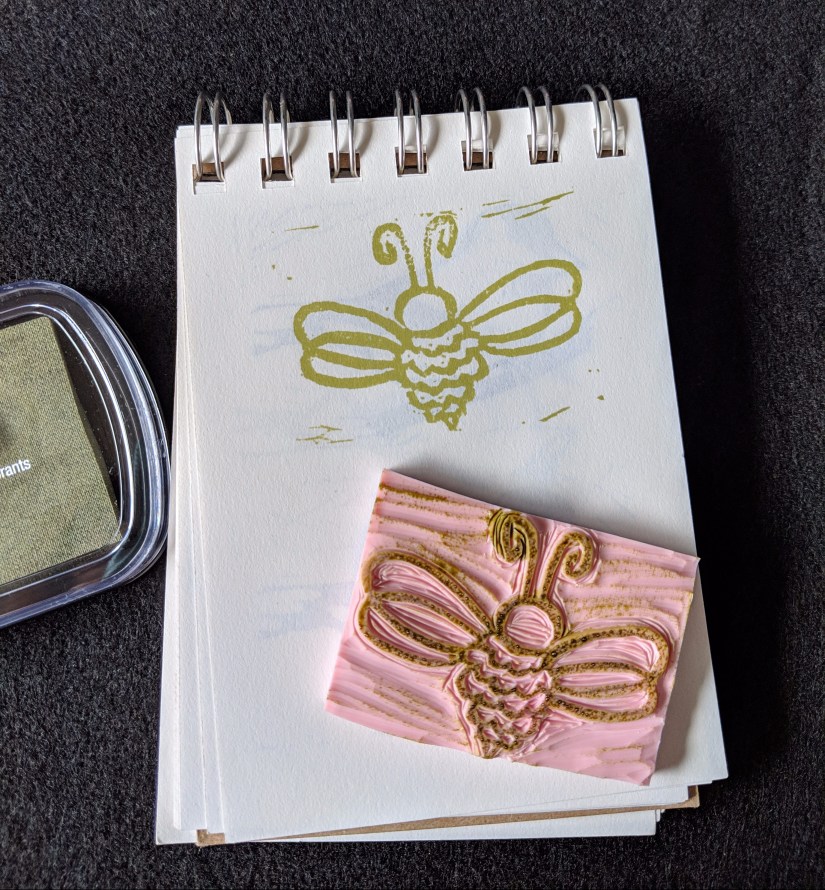
Step 1—Drawing: Begin by drawing your design on a piece of paper. A good size for your design is about 2” x 2”. Most of the logbooks you’ll be stamping are pretty small. Your design should hint at something unique or special about you, and it should have simple lines—not too much detail, at least for your first stamp. Trace over the lines of your drawing with a pencil to darken and thicken them, then press your paper, design-side-down, onto the carving block (which you should pre-slice into the size you want your stamp to be). My favorite carving block is the rubbery pink Speedy Carve. (I buy it from the local craft store and use a coupon.) With your drawing facedown, rub the paper firmly with your finger to transfer a shadow of your design onto the carving block. Before you lift the paper away from the block, peek underneath. Do you see a mirror image of your drawing? If so, you’re ready to carve. If not, carefully lower the paper and rub some more to finish transferring your pencil lines to the carving surface.
Step 2—Carving: For my first few stamps, I carved my design using an X-acto knife. While this did work, it was hard to get my carvings super clean and finessed. I upgraded to a set of carving tools from the craft store, little gouges intended for linoleum and other substrates—like letterbox stamps. Carve away all the negative space from your design, using the wider gouges to remove a lot of rubber quickly, then shifting to the narrow gouges for careful work around the lines of your design. Remember, you can always remove more rubber, but once it’s carved away you can’t put it back.
Step 3—Refining: When you think you’ve got your stamp in pretty good shape, give it a test run. Ink it up on your ink pad and press it onto a scrap sheet of paper. There will almost certainly be some spots that need further refinement. Rinse off and dry the stamp and attend to any areas that need more material removed. After a few more rounds of testing, you should be ready to hit the trail!
Now you have your very own one-of-a-kind stamp to make your mark in the letterboxing world. I’m sure you have an awesome trail name to go along with it. You are more than ready to get out there and enjoy some letterboxing adventures. Stay tuned for my third post in this series, which will help you take your letterboxing game to the next level by creating a series of your own for others to find!
It’s not quite a scavenger hunt, though it does involve hunting.
It’s kind of like geocaching, but you read clues rather than coordinates.
It requires secrecy and pseudonyms, yet it’s wholesome enough for your grandma to do.
…………………………………………………………………………………
Think you’ve puzzled it out? Why, it’s letterboxing of course!
The Backstory
This was the first letterbox I ever found. Coincidentally, cardinals are one of my favorite birds.
I learned about letterboxing 10 years ago when my niece was in kindergarten. Her teacher introduced letterboxing to the students, and my sister, a volunteer in the classroom, learned about it by extension. She was hooked from day one, and soon after shared her newfound hobby with me.
So, what is letterboxing? Here’s how it works: Someone conceals a waterproof box in a public location. Inside the box you’ll find a logbook and a hand-carved stamp. The hider posts clues online (websites listed below) with step-by-step instructions on how to find the box, and then YOU set off to find it! When you do find it, you use an ink pad to add the found stamp to your personal logbook. Then you add your personal stamp to the found logbook to document that you were there. An exchange of stamps. Date and sign the page (using your trail name—yes, you get to make up a trail name)—and that’s it!
According to legend, letterboxing began in England in 1854. A hiking guide named James Perrott hid a bottle at the end of a difficult hike along Cranmere Pool in Dartmoor, England. He left a calling card in the bottle so that future finders could contact him, and encouraged these tenacious hikers to place their own cards in the bottle as well. Some years later, the bottle was replaced with a box, and hikers began leaving self-addressed postcards that the next finder would mail from their own hometown. (And in England, a mailbox often is called a letterbox.) The hobby continued to evolve and gain popularity in Dartmoor, but didn’t reach the U.S. until 1998, when Smithsonian magazine featured an article about letterboxing. (To learn more, you can read a detailed history of letterboxing HERE.) Today you can find letterboxes in every state around the country, and in fact it’s a fun way to explore and document places you’ve traveled.
Letterboxing Gear
I have a little satchel with all my letterboxing gear that I keep in my car, so I’m ready at any moment to take advantage of a letterboxing opportunity. The letterboxing websites list all of the boxes in a particular area, and I like to scan these periodically and file those potential locations away in my memory. When we’re traveling, my husband loves when I request a little detour to seek out a letterbox. (Okay, well he at least tolerates my letterboxing enthusiasm.)
These are the essential supplies in my kit:
Stamp Logbook Pen Ink pad Wet wipes (while not essential, you’ll be digging around in bushes and under rocks sometimes; it can get a little messy)
You can get all of these things—stamp, notebook, ink pad—at any craft store. When I learned about letterboxing, I didn’t know at first how much I would enjoy it. I was hesitant to invest too much time or money in a hobby that might just fizzle out. If you want to just try it and see what it’s like, before buying too much gear, it is acceptable to use your thumbprint as your “stamp” to make a mark in the logbook of any letterboxes you find. If you decide that you like it but don’t have the time to carve your own stamp, there are plenty of ready-made options to purchase at the store. So whatever the situation, there’s no reason not to get out there and give it a whirl. Eventually you will probably want to carve your own personal stamp—that’s what you see in the photos—and my Letterboxing 201 post walks you through how to do that.
So Many Reasons to Love Letterboxing
Once you try letterboxing, I’m sure you’ll have your own list of reasons why you love it. Here are a few of mine:
1. Discover hidden gems: There are numerous parks and sites that are just far enough off the beaten path that I would never have encountered them if not for letterboxing. It gets me out and about and leads me on spontaneous adventures close to home.
A fellow letterboxer/Nancy Drew fan created this stamp.
2. Learn new things: People create letterboxes because they have something to share with the world. Sometimes they want to draw visitors to a historic or meaningful location. Other times, people create a letterbox—or series of letterboxes—to honor a particular person, place, or thing. I love the opportunity to learn something about history, pop culture, or the personal experience of a fellow adventurer.
3. Travel souvenir: I always tuck my letterboxing gear into my bag when I go on a trip. Wherever I am—a city, a national park, a nondescript suburb—chances are there is a letterbox somewhere nearby. The collection of stamps in my logbook is an evolving souvenir and a unique way to remember the places I’ve been.
4. Fun for all ages: I have been letterboxing with my young nieces and nephews, and I’ve been letterboxing with my grandma! I mean, who wouldn’t enjoy a hunt for hidden treasure boxes? But here’s a piece of advice: If you can take a child with you on a letterboxing jaunt, you’ll look much less suspicious snooping around bushes and trees. And never forget the cardinal rule of letterboxing: Be stealthy and do not advertise that there is hidden treasure nearby.
5. The occasional misadventure: Letterboxing excursions do not always proceed exactly to plan, but that is part of the fun. Here’s an example: I love cats, so I was excited to discover that there was a letterbox hidden at a local cat rescue organization. Sometimes stamps are stashed at an indoor location with the owner’s consent, and you have to ask for it to earn it. I must admit, I felt a little weird sidling up to the counter like, “Heyyyy, so … I think you have something for me? …” And then it was especially awkward when the girl had no idea what I was talking about. We rounded up another employee, who had a dim recollection of a letterbox being hidden there, but clearly it hadn’t been found in a long time—boxes do go missing sometimes. A letterboxer must accept the occasional fail. BUT since I was already there, I visited for a while with the numerous, and very affectionate, rescued cats. Fell right into their trap, lured to the shelter by a phantom letterbox those critters no doubt planted themselves.
Hit the Trail!
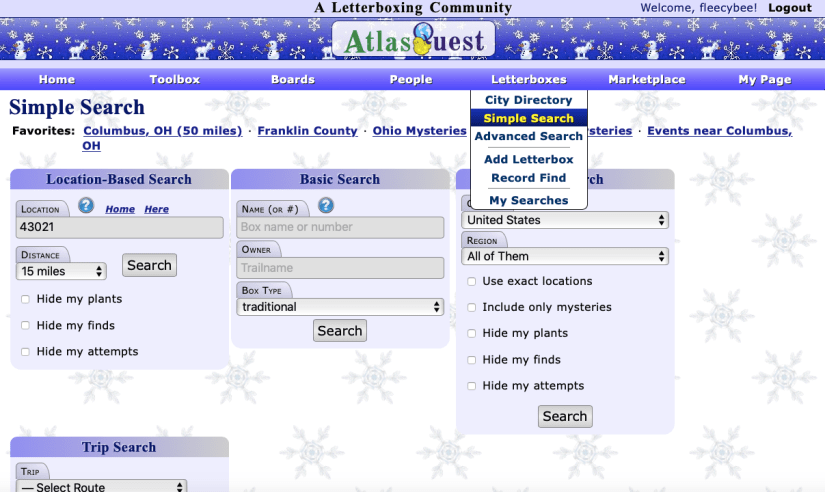
There are two main websites for the letterboxing community. On either one you can find letterboxes to search for:
I tend to use Atlasquest, although it is good to check both websites. My favorite way to locate boxes is to search by zip code. If you set up your own account, you’ll receive notifications when new stamps in your area are added. You’ll also be able to log your finds online, to keep track of your discoveries and offer feedback and comments to fellow letterboxers.
I have a hunch that once you try this, you’ll be hooked just like I was. I’ve even created two letterboxing series of my own, carving the stamps, writing the clues, and stashing the boxes out in the wild for others to find. If you’re ever in the Galena area (zip code 43021), you should try to find them!
There is a farm not too far from where I live, on a quiet country lane called Monkey Hollow Road. I’ve visited several times, as the owners (Al and Jill) enjoy sharing their love of growing, creating, and learning with others. A family member is good friends with Al, so we often have the inside scoop about happenings at the farm. We’ll get messages like: “Al is bottle feeding the baby lamb! Want to go watch?” or, “Al is making apple cider this weekend. Want to go along?” And most recently: “Al is extracting honey this Sunday. Want to come help?” Um, yes, yes, and YES!!
Al and Jill are the coolest people. So easygoing and down to earth. They have a little bit of everything on their Monkey Hollow farm—sheep, chickens, vegetable garden, apple orchard, fishing pond, and of course—beehives!
Today was honey extracting day, and 10 of us showed up to help. Extracting honey is a multi-step process but is surprisingly simple. There are elements of the process that can be mechanized, but part of what is so neat about Al’s setup is that the tools and machinery are low-tech, timeworn, and simple. I like when things are simple.
Al has Langstroth hives, a popular and traditional system that uses a series of stacking boxes called “supers.” Inside the boxes are hanging frames with cells that the bees fill with honey. Once the cells are packed with honey and the bees have coated the surface with a protective layer of wax (beeswax!), the frames are ready to be removed from the hives for the honey to be harvested.
In the first step of the honey extraction process, you shave away the beeswax layer with a hot knife. Al makes this operation look exceedingly smooth and easy, the layer of beeswax falling away in a single unbroken sheet. For the uninitiated, however, there is a bit more beeswax butchery that occurs. It’s hard to hold the knife at just the right angle and tricky to skim it across the cells at just the right speed.
In the background, you can see one of the supers with the honey-filled frames all lined up.
The next person takes two of these shorn frames and shuttles them—heavy and dripping with honey—to the centrifuge. These drop into baskets on opposite sides of the drum and as the next helper turns the crank to spin the centrifuge, the rotational force pulls the honey out of the comb. It collects in a shiny layer on the sides of the drum before slowly dripping down to the bottom. Turning the crank on the centrifuge was my four-year-old nephew Simon’s favorite part by far. Jill brought out a step for him to stand on so that he could reach the handle, and turning it was a two-handed, full-body exercise for him. I bet his little abs were sore the next day.
Before long, the honey at the bottom of the drum is deep enough that it starts to interfere with the spinning mechanism. The next step is to open the valve at the bottom and begin decanting the honey into buckets to be transferred to the filtration vat. The honey goes through two rounds of filtration before it’s bottled and ready to sell or trade. As a “thank you” for helping, Al gave each of us a jar of the day’s honey to take home. Those jars went through only the initial sieve—just enough to filter out any stray bee legs and chunks of wax.
I enjoyed the day of honey harvesting for a number of reasons, but if I were to list my favorite things about it, these three would rise to the top:
1. Axle Grease
Well, not actual axle grease. Not surprisingly, Al is quite a connoisseur of honey. When he travels to different states and different countries, he likes to share his Monkey Hollow honey with other beekeepers and collect as many varieties as he can. Just for fun, he arranged a honey lineup from his collection for us to sample.
It began with a super light linden honey, progressed to a medium-bodied manuka honey from New Zealand, and finished with the extra dark and molassesy honey he affectionately calls his “axle grease.” Starting from light to dark, we dipped toothpicks into the honeys and tasted each one, as Al excitedly solicited feedback about which were our favorites. The linden honey was popular, as was a blueberry variety. I was a little wary of the axle grease, but it was delicious!, bold and assertive, the honey equivalent of a French roast coffee. I expected to be blown away by the manuka honey, since it is ridiculously expensive in local stores due to its rarity as well as its medicinal properties, but taste-wise . . . it was just okay. The clear winner for me was the honey we were extracting and bottling THAT day, the apple honey from Al’s orchard. That honey simply exploded with a bright, pure, apple sweetness. Honey doesn’t come any better than that.
2. The Honey Breeze
Ah, the Honey Breeze. One of the unexpected byproducts of the extraction process is what I call the Honey Breeze. When the honey frames are dropped into the hopper and you turn the crank on the centrifuge, a breeze rises up from the spinning baskets. A wave of sweet honeyed air caresses your face and blows back your hair. It is like being immersed in a cloud of honey, with all of the sweetness and none of the stickiness. I could bask in the honey breeze all day long.
3. Something Like Strega Nona
The very best thing about Honey Day, however, was the stories we heard from Al and Jill. Stories about Al’s initiation into beekeeping, stories about bee stings (and remedies!), stories about the social lives of bees, stories about people they know. . . . I have a feeling that Al and Jill are very popular around a campfire.
One of their stories that day reminded me of Tomie dePaola’s classic children’s book Strega Nona.
Here’s why: When you open the valve on the centrifuge to begin transferring honey to the filtration vat, the honey streaming out of the spigot is strangely hypnotic. It’s like a smooth golden rope, rhythmically unspooling and coiling into a glossy puddle. In fact, Jill told us about the time that their daughter became so mesmerized by the undulating honey that she simply didn’t notice when the container was full and it was time to close the spigot. Honey ran and ran, overflowing the container and creating a sticky flood on the floor of the workshop. In Strega Nona, it is not a flood of honey, but rather pasta from a magic pot that floods an Italian village when Strega Nona’s assistant muffs up the magic spell. He is made to right his wrong by eating the superfluous macaroni—a fitting punishment, right? (I’m pretty sure that Al and Jill didn’t force their daughter to eat her way out of the mess she created. Though if you ask me, I’m not sure that would really be much of a punishment!)
At the end of the day, after enjoying the fruits of the bees’ labor so thoroughly, many of us were curious about seeing where all this honey magic begins. Al promised that at the next Honey Day, we could don some protective gear and he’d take us out to visit the beehives. The fun and adventure never ends at Monkey Hollow!